
My Cheap Snow Camping Sled
(rev
A)
by Michael Krabach
The Problem
Most commercial snow camping sleds (called a pulk or pulka in Europe) and expedition sleds, are quite expensive. They can be in the several hundred dollar range, and while worth it for major a expedition, for the casual winter camper who may only do a couple of trips a winter, such an expenditure seems a little pricey. Therefore I started looking around for a cheap alternative. Several references on the Internet show homemade and professional sleds. These gave me ideas, but they either had some feature that I did not like or the basic sled was not available locally.
Searching
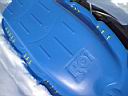
First was a search for a sled. Preferably cheap, real cheap. I searched all the local stores that carry children's snow sleds, including the major chains; Target, Benny's, Walmart, Kmart, Eastern Mountain Sports, The Sports Authority, Dick's Sporting Goods.... finally "Toys Are Us". There it was, the prefect cheap sled, one short one for $13 and one long one for $16. First let me explain what makes a good sled and why ones in the other stores did not make the cut. Toboggans are not suitable because they are too narrow, at least the less expensive ones, and if they tip slightly in the deep snow, the sides drag. Of the plastic child sleds, many have a boxey front that seem barge like. Some are just too small or narrow to carry enough camping gear. The round ones are no good, as are the ones that do not have straight runners on the bottom. I was surprised to see so many with molded bottom runners that curved out on either side. I presume it is to make turning easier if you lean hard to one side, and to keep the speed down. Not what we want. Most of them were not very stiff, including the "Toys Are Us” sleds. But that is solved later. So the model selected is the HO! by Recreation Inc. (These sleds are also available in Canada from 'Canadian Tire' stores.) The models are the 3011 which is 48” (label shown below) and the 3012 which is 66” long. All images are clickable for larger images.
Material List
The first problem is making the sled stiffer. As purchased, these sleds are obviously throw away plastic sleds, to be used a few years by the kids and chucked.
I found out that PVC piping would suitably stiffen the rails of the sleds. The PVC piping also was nice because rope could be threaded through it. For cheap rope I used yellow polypropylene rope, the kind used for water ski tow rope because it is highly abrasion resistant and slippery. This was for the hinge from the sled to the tow bridle. For the tie down ropes I used the cheap multicolored poly rope available at Home Depot or Lowes. It is softer and easier to work with than the polypropylene rope. For fasteners, I used large nylon tie wraps available almost at any hardware store. For the tow harness I used the toy carabiners and real carabiners. The tow belt was sewn from 2” nylon web with an old Kelty frame pack quick release buckle.
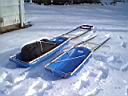
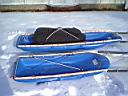
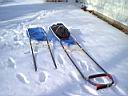
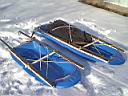
Final Resulting Sleds
Sled Assembly and Construction
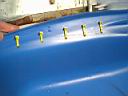
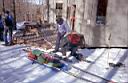
The stiffening of the sled rails was done by drilling double holes along the rail to attach the ½” Sch. 40 PVC pipe. For the long sled, a 10 ft piece of pipe is cut in half, just perfect for the 66” long sled. The rail pipes for the short 48” sled are about 42” each. The holes for nylon tie wraps are eyeballed as to location. Don't be skimpy, tie the pipe down firmly to the lip of the sled. Feed the tie wraps from the bottom first because the trimmed nylon ends will be sharp and should be under the sled tails. The sleds have a slight shear upward, but the pipe will conform. Every other pair of holes is not used yet. They will be used to fasten the tie-down rope (multicolored orange) and the pipe to the sled. Look closely at the photos below.
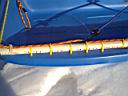
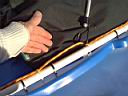
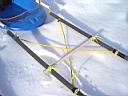
The tie-down rope is one piece that loops around on top of the rails from the rear, around the front and back to the other side. A loop is tied at each end for attaching a rear control rope. See the first photo below. Your partner will need to be on the end of the sled with a control rope when going down hill and these loops are necessary. Note that everything is tied to the stronger PVC rails, not to the sled. I double wrapped a nylon tie (the clear ties) to each end of the PVC pipe where the rope might be pulled at an 90 degree angle at times. After sizing the tie-down rope, use the remaining holes to tie wrap the rope and pipe to the sled. Note in the second photo above the method of attaching loads to the sled. With the continuous tie-down rope on top of the PVC rail, you have any number of attachment points for bunge cords or straps.
The towing harness is constructed from 3/4” Sch. 40 PVC pipe. A 10 ft length is cut in half, one for each side. You may want to bevel the inside edge of the all the pipe ends with a knife to make them less sharp on the rope, especially at the connection between the sled rails and the harness piping. The yellow polypropylene 1/4” rope is threaded from the front, down one side, into and through the 1/2” rail, around the rear, up the other rail and through the opposite 3/4” pipe. Note that you are pulling the sled indirectly by using the stronger PVC rails. The tow harness should not be attached to the sled proper.
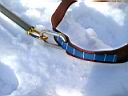
Next is the tricky part of the tow rope assembly, making it so that a loop at each end only protrouds out slightly to attach to a toy caribiner. See the third photo above. Tie a loop at one end. (I used a figure 8 knot.) Then tie a strong string to that loop. Pull from the other end to suck the loop into the 3/4” pipe, about a foot. Tie a loop on the other end, but don't cut any rope yet. Now pull on the string to retrieve the first loop and see if both loops end up with the proper amount sticking out of the ends. This will take several tries to get the second knot at the right spot. Remember that the rope will stretch under load, so tension it accordingly when adjusting the length. Always keep the toy caribiners on the loops or you will have to retrieve the loops from inside the pipe. The object is to have the harness as close to the waist belt as possible, to prevent the sled from bumping back and forth when towing over small bumps and hills.
The towing harness needs to be flexible but not to much laterally. This is what the yellow X bracing with the 1/2” crosspiece is for in the second photo above. The 1/2” PVC pipe sets the fixed spacing. For most people make the spacing so the harness pipes are parallel. The cross piece is slightly notched to prevent it from slipping on the harness. Make a careful round notch to fit the 3/4” pipe. To deep and it will break in the cold. An alternative would be a square wooden crosspiece. (Note: I have had several of the nylon tie wraps connecting the crosspiece break. This occurred at temperatures slightly below freezing. I would now recommend that the crosspiece be only lashed with cord or thin rope.) The yellow X ropes are slightly loose as seen in the second photo above. On the short sled I ran out of hose clamps so I fixed the front end of the X bracing with electrical tape and tie wraps. Loop rope back and tape it so it will not slip. The other ends are fastened with hose clamps which can be used to adjust the tension of the bracing. This bracing is necessary to prevent jackknifing while towing if the sled starts to slide sideways.
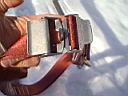
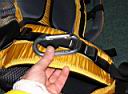
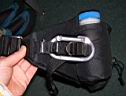
The waist belt is sewn from 2” nylon webbing with additional (blue) webbing sewn along each side to adjust the waist size as seen in the first photo above. I salvaged an old but excellent stainless quick release buckle from an old Kelty frame backpack as seen in the nextphoto above. I would suggest using a scuba belt quick release buckle which are available from Scuba shops. These are better than the standard 2” plastic quick release style (ITW Nexus is one brand) commonly used on backpacks, because they are easily opened with bulky mittens. If you want to use a backpack besides the sled, the belt will get in the way of your waist band. In this case you may sew webbing loops (two in this case for adjustments) directly to the backpack side tension straps as seen in the third photo above. Packs vary in design and some may not have waist straps that are easily sewn with a home sewing machine. The last photo shows another option using a cheap fanny pack which has the loops have been sewn on the tension belt.
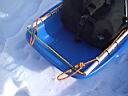
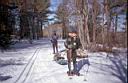
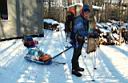
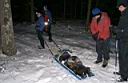
When the harness is folded back as seen above, the sleds are easily carried upside down on top of a car rack or for storage. The photos below show the longer sled being packed and towed under ideal conditions. Note PVC becomes brittle under impact at extremely cold temperatures, so be careful if camping below zero Fahrenheit. The nylon tie wraps should be good well below zero, but I have yet not found firm cold weather data on PVC pipe or the polyethylene sled material. This is a topic to be investigated. Also over years the PVC plasticizer migrates to the surface and the material becomes more brittle. Do not store your sled system in the sun, which causes UV degradation, or in high temperatures which increases the rate of plasticizer loss. An alternative under really cold temperatures would be to use aluminum tubing to substitute for the PVC piping. If so, the rails would have to be slightly bent (tricky operation for hard drawn aluminum tubing) to fit to the shear of these particular plastic sleds and not distort the sled itself.
The Sled in Action?
Some interesting sites on the Internet showing other homemade and commercial sleds.
For a simple plastic pulka from Mark Harris in Sweden, http://xray.bmc.uu.se/markh/skiing/pulka_english.html
For a similar plastic pulka with a few photos showing it in use from Germany, http://www.wolfgang-reinelt.de/Outdoor/PulkaHowTo/index.html
The www.inquiry.net by Rick Seymour, [Dead Bugs, Blow Guns, Sharp Knives, & Snakes: What More Could A Boy Want?] has an index on how to build many types of historical sleds, http://www.inquiry.net/outdoor/winter/gear/sleds/index.htm . Included is a simple plastic type with a few photos, http://www.inquiry.net/outdoor/winter/gear/sleds/equipment.htm .
For two homemade sleds, one of steel piping and one of PVC, showing photos only, http://community.webshots.com/album/60736384GGunub.
Here is a forum on homemade sleds with two variations. http://www.clubtread.com/sforum/topic.asp?TOPIC_ID=20245
From Granite Gear a professional sled for about $600 http://www.granitegearstore.com/Pulk-Sled-C23.aspx
For several commercial fiberglass sleds about $550 http://www.kifaru.net/sleds.html
For examples of commercial pulka, look at the Turpulk at http://www.fjellpulken.no/
From an ultra marathon in the Yukon, comments on both homebuilt and commercial pulks. http://www.arcticultra.de/en.php?Gear:Pulk_Sleds
A site that sells plastic commercial sleds (in the UK) for making your own pulk http://www.snowsled.com/polar/pulks_plastic.htm
From Loomis Adventures, has reviews of two sleds. The Paris Expedition Sled is $40 and the Pelican Snow Trek 60 Gear Sled is $41. The Pelican is a little larger and heavier plastic than the Paris.
rev 1-12-2011